A Very Challenging Large Aspen Burl
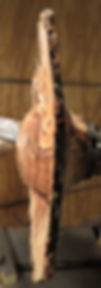
This is a story about turning this large (22" diameter) aspen burl into a bowl. The burl was fresh cut (green) and came from the south shore of Lake Superior in the upper peninsula of Michigan.

I decided to place the foot or bottom of the bowl on the top of the burl so the natural bark edge of the bowl will be the lower perimeter of the burl. Below are several images showing this burl secured to my Vega bowl lathe.


The image on the left shows the burl secured with a face plate. This is the safest way to secure a large piece to a lathe. I also used a live center in the tail stock for additional support and safety (right image). Burls often have decayed areas, bark inclusions, and cracks that can cause a them to fly apart while turning. This extra tail stock support will help keep the burl from breaking loose from the face plate.

This image shows the tail stock view of the burl. I had to use wood filler (fine wood dust and CA glue) to smooth the bottom of the burl so a stable tenon can be turned. There was a decayed depression in this area that you can see in the first image of the complete burl at the top of this post.

The above image shows the tenon I initially turned. I also started turning the side of the burl. Since this burl is not very symmetrical the cutting only happened along outer most parts of the burl. I kept carving the burl with a gouge to see how the bowl will take shape. There are a lot of options here especially if you can accept holes in the sides of the bowl. That can look OK with bark inclusions around the edges of the holes, but in this case I am trying to shape the bowl to close up the holes.


These two images show the completed outer profile and the final tenon that will be used for reverse mounting the piece on the lathe for hollowing. I let the wood's grain figuring and decayed areas dictate this outer shape.


These two images show the reverse mounted burl ready for hollowing. I used a Oneway Stronghold chuck with #3 jaws to grab onto the 5" diameter tenon. The image on the right shows the burl set up for hollowing. This part is rather tedious since the burl wood is hard and full of frost and stress crack along grain lines. I apply thin CA glue into these cracks as I hollow. If the cracks run across the entire piece I will wrap the outer part with duct tape to make sure it does not fly apart. That was not necessary with this burl.

These images show the start of the hollowing process. I used a live center tail stock for the start of hollowing, especially when turning the outer areas where the torque on the chuck is greatest. This is an added security and will prevent the piece from flying off the lathe. I have had a tenon break off the bottom of large burls due to hidden decay or cracks just below the chuck. I have never had a Stronghold chuck lose its grip on a tenon! You can only use the tail stock during the beginning of hollowing. The image on the left shows the tail stock removed since the outer edge thickness is now set and I have carved inward as far as possible. I usually aim for a wall thickness of 3/8" to 1/2" in large burls as this best shows off the bark and minimizes the chance of fracture along grain lines.
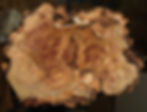

These two images show the completed bowl hollowed out to a consistent wall thickness. The bowl is 20" x 16" and 4" deep. It now needs a couple of months drying. Aspen burl bowls seldom crack while drying but I keep them in a humid space and observe them to stop any beginning crack with a drop of CA glue. You may have noticed the dark area that runs from the top to the bottom in the top view of the bowl. This is a line of decay that I glued and filled with dark wood dust and CA glue. This is also visible in the image of the bottom of the bowl in the completed profile near the beginning of this post. In that image the decayed area runs through the tenon. I stabilized that area with wood dust and CA glue so the tenon would hold. If you look at the first image in this post, the one of the burl before it was mounted on the lathe, you will see that the top of the burl consists of two raised areas with a gap between them. That gap is the start of this line of decay that went through the entire burl. I was certainly worried that the burl would separate along this line during the turning process. I used CA glue frequently to stabilize this area as I hollowed out the bowl, and I watched it carefully to make sure the crack was not separating while hollowing. If this crack grew during hollowing I would have wrapped the bowl tightly with duct tape to make sure it stayed together. Filling such small crack with black wood dust and CA glue when finishing (sanding and oiling) will look natural since decayed areas are black to start with. I love the challenge of turning large burls like this since it requires all of the skills I have learned and more, what I call creative problem solving.


