An Interesting End Grain Turning of a Buckthorn Crotch
- Lou Pignolet
- Nov 14, 2020
- 2 min read
Updated: Dec 18, 2020
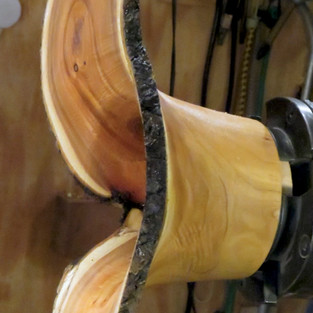
I turned a small buckthorn crotch along the axis of the log, or end grain, to give an unusual bowl shape, and to hopefully show the interesting wood grain in a crotch. The following images show the crotch attached to my lathe using a small two prong drive and a live center in the tail stock. The image to the right shows why this is called an end grain turning. Turning end grain is slow going since you are always cutting along the end of the grain direction. You only get wood dust flying from the gouges, no long curled wood chips. This wood is fresh cut (green) so it was not so dusty. This crotch measures about 12 inches from top to bottom in the image to the left. European Buckthorn typically has cracks and lines of decay. You can see a fracture running along the main log between the branches in the two images on the right. I applied thin CA glue along this crack to help stabilize this piece.
The following images show the turning of this crotch. The bowl measures 12" at its maximum diameter, 6" at its minimum diameter, 4.5" high, with a ¼" wall thickness. It took me nearly 5 hours to turn this piece. There was a lot of decay along the intersection of the branches, but there was enough solid wood to prevent any separation. I also used a lot of CA glue and fine ground coffee to strengthen the decayed areas. The third image below was taken during hollowing just after removing the live center tailstock. I like the security the tailstock gives at the start of hollowing with winged style bowls. The rest of the images show the bowl on the lathe at the end of turning. The figuring and colors in this wood are beautiful. This is my fourth buckthorn turning and I have found the wood to be dense with very fine grain and although there are fine cracks or fissures in the wood, they are easy to stabilize with CA glue. I have not found any issues as the bowls dry, only minor warping, and no serious cracking even with the pith (log center) in the bowls. I do dry the bowls under controlled conditions of about 65% relative humidity at 65 deg F, and I apply thin CA glue to the pith areas and to any small crack that starts. This bowl should take at least two months to dry. I monitor the weight to determine when the % water in the wood reaches a stable minimum. I re-turn the bottom of dry bowls during the sanding process to remove or reshape the tenon and to smooth out any warping in the base.
The following gallery of images show the finished (sanded/oiled/waxed) bowl in all its glory.


Comments