The Happiness and Satisfaction of Turning Aspen Burl Bowls
- Jul 29, 2022
- 2 min read
Any one reading my blogs or just looking at this web site will know that aspen burl is my favorite wood to to turn. The wood is beautiful with striking figuring and colors, but there are more reasons why I love turning this burl wood. The wood is very rare and it grows locally and it is very challenging to turn. I entire process requires patience, imagination, and detail. These are things I really love. The burls are usually gnarly and decayed. I often spend hours stabilizing (with thin cyanoacrylate (CA) glue or epoxy) and cutting a burl. It is fun to visualize the bowl or bowls in the burl and to cut out pieces to attach to my lathe. I am of course motivated because I know the final product will be beautiful, but I look forward to the turning process. I generally take one day to turn the outer profile of the bowl and another day to hollow the bowl. It is slow going since each area of decay and each separating grain line needs to be stabilized by application of thin CA glue. It is especially tricky working near the bark, and it is important to keep the bark on the bowl. There is generally decay just under the bark. I adjust the shape of the bowl to best show the beauty of the wood and to achieve a pleasing form. A stable tenon must be turned onto the bottom of the bowl and if there is decay around and under the tenon (not unusual), a lot of extra time is needed using glue and filler or attaching a secure removable tenon.
The hollowing process goes quicker but special care is required cutting near the bark and stabilizing decay and open grain areas with CA glue. I have had bowls fly apart during hollowing so I wrap duct tape tightly around the outer part of the bowl. Plastic food wrap also works. I aim for a wall thickness of ¼ to ⅜ inch, and a bit thicker with larger bowls. Aspen burl is best turned green so the bowl has to be dry before sanding. I dry under controlled temperature and humidity but aspen burl seldom cracks. The bowls typically warp a little so the lower part of the bowl must be re-turned to achieve a proper base. Once dry I sand to 400 grit and use CA glue and wood dust to fill the small cracks and grain openings as needed. I seal the wood with pure tung oil, dry for a day or two, and apply a thin coat of walnut oil saturated with beeswax. Buffing when dry completes the process. The following images show the latest completed aspen burl bowl. It has dimensions of 8.57" in diameter, 5.5" high, with 5/16 " wall thickness.

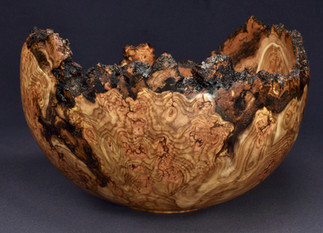


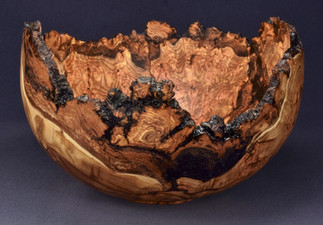
This bowl has beautiful figuring typical of aspen burl. The jagged bark edge also adds a nice look. This is the type of bowl I see in my dreams and sometimes turn.


Comments