Working on Some New Aspen Burls
- May 4, 2022
- 3 min read
Updated: Jun 4, 2022
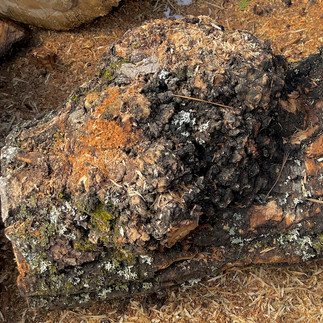
I love turning aspen burls but they are very rare and I depend on loggers to sell them to me. These days most loggers seldom leave their large harvesters and stopping to get burls slows down their operation. I only got one aspen burl during the past 3 years! A few weeks ago a friend and I purchased eight large burly logs from local loggers. Here is a photo of a few of the logs. Each log is 15-20" in diameter and contain several large burls. We are sharing the burls.


I started working on these burls a few weeks ago. I try to make the largest possible bowl from each burl so there is a lot of studying and thinking before cutting. Aspen burls also typically have decay and insect infestations. I selected one of the logs that contains a nicely shaped burl. Most of these burls are not real deep so it is important to cut into the log about 2-3 inches below the bottom of the burl (this also helps in turning a stable tenon on the bottom). I always visualize the bowl, especially its bark edged rim. I find it helpful to mark the vertical axis of the bowl with a long nail or spike, and use that as a guide for cutting the burl. I basically make cuts parallel to the spike in a circular pattern. The following images show the trimmed burl on the lathe, and the resulting rough turned bowl. This will give a bowl with a round shape. Here I have also curved the top edge of the bowl inward since that worked best for this burl. There are of course other ways to trim a burl.


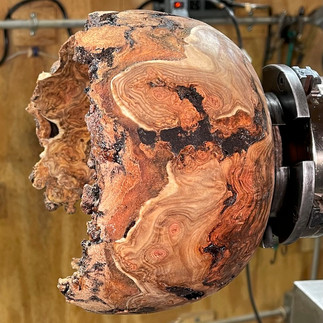


This bowl is 8" in diameter. Note the spike in the first two images that shows the bowl's vertical axis. I think you can see why I love aspen burl bowls. The patterns, figuring, and colors are amazing, even before sanding/oiling when dry. The finishing process will make the patterns and colors really pop out. The bark edge is jagged and beautiful. You can see the areas of decay in this bowl. Every such area has to be stabilized with CA resin and dark wood powder (or fine ground coffee). I stabilize these areas of decay many times during the turning process. I also tightly wrap the entire bowl with duct tape and plastic wrap during the hollowing process to prevent the piece from flying apart. Aspen burl is always tedious to turn for all of these reasons. I spent a total of 5 hours working on this bowl so far! Now for the drying and sanding processes. Sanding will take at least 3 more hours.
Addition made on May 29: The following gallery shows the finished (sanded and oiled bowl)


The next gallery of images shows similar steps for turning a 9" diameter aspen burl bowl.


This bowl has now been sanded and oiled and here is a gallery of the finished bowl.


The next gallery shows a similar series of images for turning another aspen burl bowl. This one is 11" in diameter. Included are images during the hollowing process where duct tape was used to prevent the bowl from flying apart.


These bowls will be spectacular when dry, sanded, and oiled. They already show amazing colors and figuring. Sorry for posting so many images. It has been a long time since I have had aspen burls so I got a bit carried away.


Comments